
Customize your store page
Last Updated on:2023-05-05 03:54:17
The App Mall provides a set of intuitive tools to help build a store and the builder tool contains a page header, footer, theme colors, menus, and homepage content. Here's how to use it.
In this section
- Store page
- Theme
- Menu
- Footer
- Publish store page
Store page
The home page of a store generally serves as the entrance to the entire store, which greatly affects the user's perception of your brand.
Based on the homepage design, you can build a rich homepage that showcases your brand, brand story, and popular products
Steps:
1. Go to the Storefront -> Store page via the navigation menu
2. Component addition
By dragging the component into the middle area in the Component List, complete the configuration according to the configuration items supported by the component.
Different components have different configuration items
3. Component removal
By clicking on the component in the middle area, select the component, you can see the component's Delete button, click Delete
4. Sequencing of components
You can sort up and down by dragging components in the middle area
5. You can click the Publish button to complete the release of the homepage.
Once the homepage is released, the update of the store's homepage will be completed dynamically.
You can also save the homepage to the draft status by clicking the Save as Draft button below.
Then click Publish again to complete the update operation of the homepage after confirmation
Theme
In the theme settings, you can upload the brand logo, navigation buttons, and background color. You can also control the theme color of your store.
Setps:
1. Go to the Storefront -> Store page via the navigation menu
2. From the menu in the upper right corner, switch to the Theme card
3. Control the logo, navigation buttons, background color, and theme color in turn
Check 'Keep the same with App’s theme', the store will obtain the corresponding theme color information from the App and configure it accordingly.
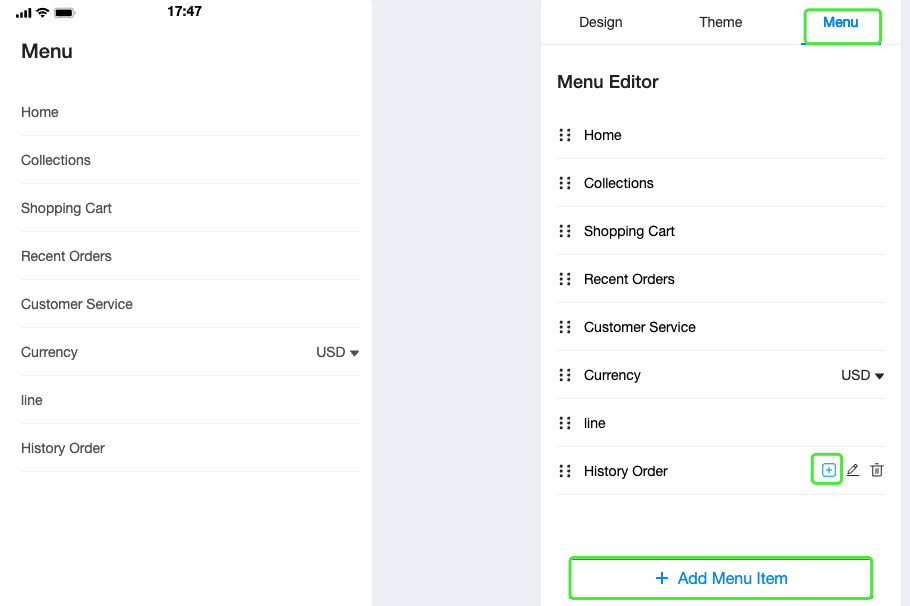
Menu
In the menu settings, you can have very flexible control over the menu items after the user clicks on the top navigation.
By default, we provide some default menu items, which are recommended not to be easily modified.
Steps:
1. Go to the Storefront -> Store page via the navigation menu
2. From the menu in the upper right corner, switch to the Menu card
3. Click the +Add Menu item button, enter Menu Name and Link Type
- Collections
You can direct users to a single collection page. You can also direct the user to your collection list page, which is a list page of all collections.
- Pages、Campaign page
Create different landing pages through the navigation menu Page and Campaign page. And you can point to them through the menu.
- Social media
You can direct users to link to your social media platform. When the user clicks the menu, the corresponding page opens in the browser.
- Chat
You can direct users to different chat apps via menus and go directly to the corresponding chat page.
- No link
When you set the menu as no link type, the menu will add the entry of the second-level menu.
And the menu will appear in the form of parent-child menu
- Other
If you accidentally delete the store's default menu, you can retrieve those portals here.
Footer
In the footer module, you can easily complete the common information of your store, such as company information, social media information, payment information, etc
Steps:
1. Go to the Storefront -> Store page via the navigation menu
2. From the menu in the upper right corner, switch to the Footer card
Publish store page
Steps:
1. Go to the Storefront -> Store page via the navigation menu
2. You can click the Publish button to complete the release of the homepage.
Once the homepage is released, the update of the store's homepage will be completed dynamically.
You can also save the homepage to the draft status by clicking the Save as Draft button below.
Then click Publish again to complete the update operation of the homepage after confirmation
Is this page helpful?
YesFeedback